# The PACTOR-TCP-BRIDGE
 by Torsten Harenberg (DL1THM)
## What is the PACTOR-TCP-BRIDGE (ptb)
It's a tool that
- talks via a serial line (USB or Bluetooth) to [PACTOR modems](https://scs-ptc.com/modems.html) made by [SCS](https://scs-ptc.com) using the extended WA8DED hostmode [(see the manual, chapter 10)](https://www.p4dragon.com/download/SCS_Manual_PTC-IIIusb_4.1.pdf) protocol these modems offer
- offers two TCP sockets which can be used by [Pat](https://getpat.io/) (and other tools)
## What it is used for
The main purpose is to build a connection between Pat and PACTOR modems. In order to establish a "listen" mode for PACTOR in Pat,
the modem needs to be kept in the WA8DED hostmode. I found it easiest to create a separate program
for that - in the same way, the VARA modem is a separate program.
On the long run, this tool will replace the current PACTOR driver in Pat.
## How to use it
In order to use this tool, you'll need to configure it.
If you start it for the first time, it will create a default configuration file and will tell you its location:
```bash
% ./ptb
new Config file /Users/harenber/.config/dl1thm.pactortcpbridge/Config.yaml created. Please edit the Config file and restart the application
```
Now edit the file and configure it accordingly:
```yaml
device: /tmp/ttyUSB0
baudrate: 9600
mycall: N0CALL
server_address: 127.0.0.1:8300
data_address: 127.0.0.1:8301
cmdline_init: ""
vara_mode: false
```
| Variable | Meaning |
|-------------------|-----------------------------------------------------------------------------------------------------------------------------|
| `device` | Path to the serial device where the modem is connected |
| `baudrate` | baud rate of the modem |
| `mycall` | The callsign to be used on HF |
| `server_address` | server socket address for the **commands** |
| `data_address` | server socket address for the **data** |
| `cmdline_init` | extra commands sent to the modem before going into hostmode, separated by semicolons, Ex: `DISP BR 1;DISP A 1;DISP DIMMOFF` |
| `vara_mode` | see the chapter about the VARA mode |
If you plan to you Pat with the VARA driver, data `data_address` you **must** use a port number one number higher than the `server_address`.
A matching Pat config using VARA for the example above would look like:
```yaml
"varahf": {
"addr": "localhost:8300",
"bandwidth": 2300,
"rig": "",
"ptt_ctrl": false
}
```
Using PACTOR, the PTT is triggered through the modem, so you need to set `ptt_ctrl` to `false`! If you configure a `rig`, it
needs to be connected in a way that `rigctl` can configure it. Configure your rig through the PACTOR modem
is **not** supported in VARA mode.
## VARA mode
The VARA mode translate WA8DED commands into VARA commands and vice versa. See the VARA homepage for the "VARA TNC Commands"
doumentation.
If enabledm software which is written to interact with the VARA software TNC to work
with PACTOR as well. It was used by the author to use the [VARA driver for Pat](https://github.com/n8jja/Pat-Vara)
with the PACTOR-TCP-Bridge.
## How to run
As a rule of thumb, you have to start the PACTOR-TCP-bridge before you want to use
Pat and stop it after you finished using Pat.
So a typical session works like this
1. start the PACTOR-TCP-Bridge
2. wait for it to finish configure your modem
3. use Pat (or any other software)
4. quit Pat
5. stop the PACTOR-TCP-Bridge
The software supports command line options:
```bash
% ./ptb --help
Usage of ptb - the PACTOR-IP-Bridge:
-c, --configfile string Name of config file (default "Config.yaml")
-d, --daemon Daemon mode (no TUI)
-l, --logfile string Path to the log file (default "/tmp/pactortcpbridge.log")
```
which should be rather self-explaining.
A typical session (without using the daemon mode, see below) looks like this:
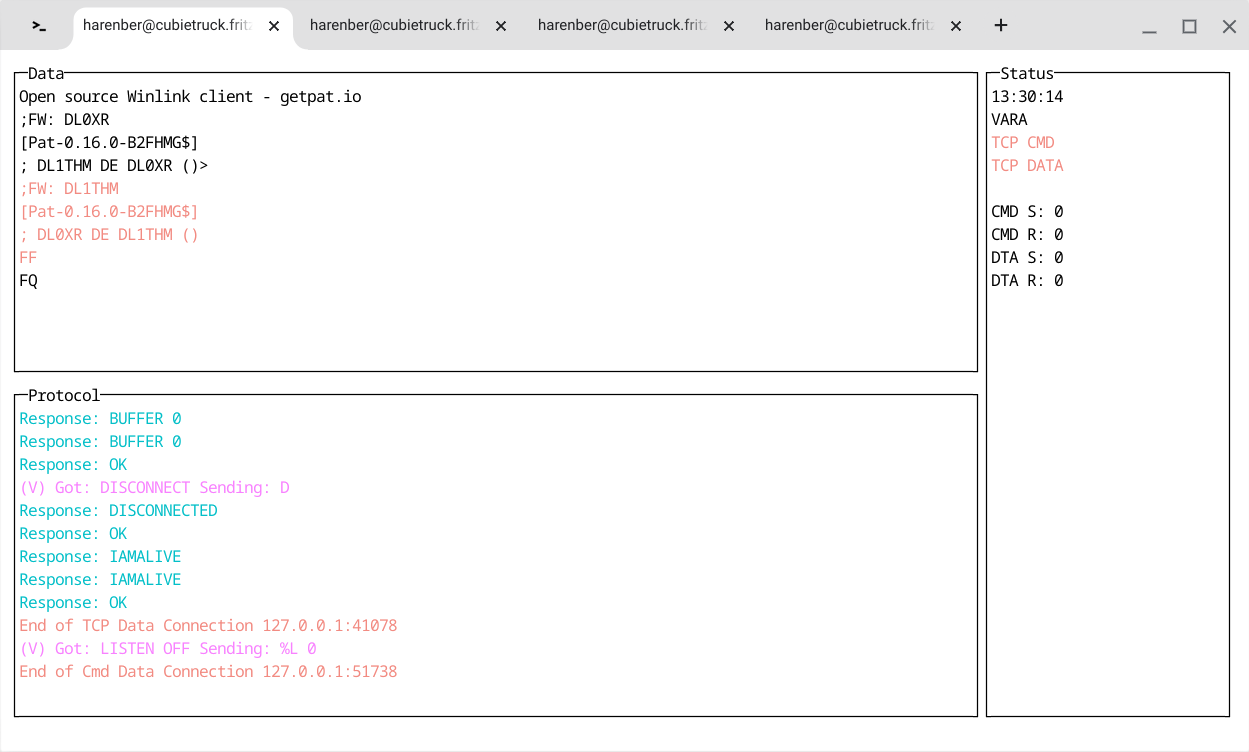
- on the upper left you will see all **payload** from and to the PACTOR modem
- on the lower left the **commands** (with VARA translations, if switched on) to and **answers** from the modem
- on the right hand side you'll see a clock, then a mode indicator (showing `VARA` or `TCP`). Furthermore, you'll see two indicator (`TCP CMD` and `TCP DATA`) which will turn green when a client is connected. The 4 counters below show the usage of the buffers.
## "Daemon"-mode
The "daemon"-mode will omit the terminal UI ("TUI") and might be useful if you have no full terminal (or to run the tool with systemd).
Instead of the UI, you will only see a message saying that you may quit with CTRL-C.
## Keys
- **CTRL-C**
by Torsten Harenberg (DL1THM)
## What is the PACTOR-TCP-BRIDGE (ptb)
It's a tool that
- talks via a serial line (USB or Bluetooth) to [PACTOR modems](https://scs-ptc.com/modems.html) made by [SCS](https://scs-ptc.com) using the extended WA8DED hostmode [(see the manual, chapter 10)](https://www.p4dragon.com/download/SCS_Manual_PTC-IIIusb_4.1.pdf) protocol these modems offer
- offers two TCP sockets which can be used by [Pat](https://getpat.io/) (and other tools)
## What it is used for
The main purpose is to build a connection between Pat and PACTOR modems. In order to establish a "listen" mode for PACTOR in Pat,
the modem needs to be kept in the WA8DED hostmode. I found it easiest to create a separate program
for that - in the same way, the VARA modem is a separate program.
On the long run, this tool will replace the current PACTOR driver in Pat.
## How to use it
In order to use this tool, you'll need to configure it.
If you start it for the first time, it will create a default configuration file and will tell you its location:
```bash
% ./ptb
new Config file /Users/harenber/.config/dl1thm.pactortcpbridge/Config.yaml created. Please edit the Config file and restart the application
```
Now edit the file and configure it accordingly:
```yaml
device: /tmp/ttyUSB0
baudrate: 9600
mycall: N0CALL
server_address: 127.0.0.1:8300
data_address: 127.0.0.1:8301
cmdline_init: ""
vara_mode: false
```
| Variable | Meaning |
|-------------------|-----------------------------------------------------------------------------------------------------------------------------|
| `device` | Path to the serial device where the modem is connected |
| `baudrate` | baud rate of the modem |
| `mycall` | The callsign to be used on HF |
| `server_address` | server socket address for the **commands** |
| `data_address` | server socket address for the **data** |
| `cmdline_init` | extra commands sent to the modem before going into hostmode, separated by semicolons, Ex: `DISP BR 1;DISP A 1;DISP DIMMOFF` |
| `vara_mode` | see the chapter about the VARA mode |
If you plan to you Pat with the VARA driver, data `data_address` you **must** use a port number one number higher than the `server_address`.
A matching Pat config using VARA for the example above would look like:
```yaml
"varahf": {
"addr": "localhost:8300",
"bandwidth": 2300,
"rig": "",
"ptt_ctrl": false
}
```
Using PACTOR, the PTT is triggered through the modem, so you need to set `ptt_ctrl` to `false`! If you configure a `rig`, it
needs to be connected in a way that `rigctl` can configure it. Configure your rig through the PACTOR modem
is **not** supported in VARA mode.
## VARA mode
The VARA mode translate WA8DED commands into VARA commands and vice versa. See the VARA homepage for the "VARA TNC Commands"
doumentation.
If enabledm software which is written to interact with the VARA software TNC to work
with PACTOR as well. It was used by the author to use the [VARA driver for Pat](https://github.com/n8jja/Pat-Vara)
with the PACTOR-TCP-Bridge.
## How to run
As a rule of thumb, you have to start the PACTOR-TCP-bridge before you want to use
Pat and stop it after you finished using Pat.
So a typical session works like this
1. start the PACTOR-TCP-Bridge
2. wait for it to finish configure your modem
3. use Pat (or any other software)
4. quit Pat
5. stop the PACTOR-TCP-Bridge
The software supports command line options:
```bash
% ./ptb --help
Usage of ptb - the PACTOR-IP-Bridge:
-c, --configfile string Name of config file (default "Config.yaml")
-d, --daemon Daemon mode (no TUI)
-l, --logfile string Path to the log file (default "/tmp/pactortcpbridge.log")
```
which should be rather self-explaining.
A typical session (without using the daemon mode, see below) looks like this:

- on the upper left you will see all **payload** from and to the PACTOR modem
- on the lower left the **commands** (with VARA translations, if switched on) to and **answers** from the modem
- on the right hand side you'll see a clock, then a mode indicator (showing `VARA` or `TCP`). Furthermore, you'll see two indicator (`TCP CMD` and `TCP DATA`) which will turn green when a client is connected. The 4 counters below show the usage of the buffers.
## "Daemon"-mode
The "daemon"-mode will omit the terminal UI ("TUI") and might be useful if you have no full terminal (or to run the tool with systemd).
Instead of the UI, you will only see a message saying that you may quit with CTRL-C.
## Keys
- **CTRL-C**
Quits the program
- **CTRL-V**
swtiches between the VARA and normal mode